In our Previous post we have learned how to add Google Maps to our App, In this post lets try to add some custom styles to change look and feel of the Map to suite App Design.
When you’re done tweaking the map you can click on FINISH. It should bring up a modal in which you can copy the json.
We can the use the function to apply the style to the map. With the following code:
If you check the folder you should see a src folder. Navigate into it, you should see pages, we will be using the home page inside the pages folder to display our map. Now let’s install the plugin Get the api key and add it to the following code
Now we install the native wrapper
We create an empty style array which we populate with our mapStyle we imported above if it is night or not. The create method takes an additional argument which is an object of settings for the map. One of the properties is the styles property which we can assign to our style array we just created.
Styling the Map
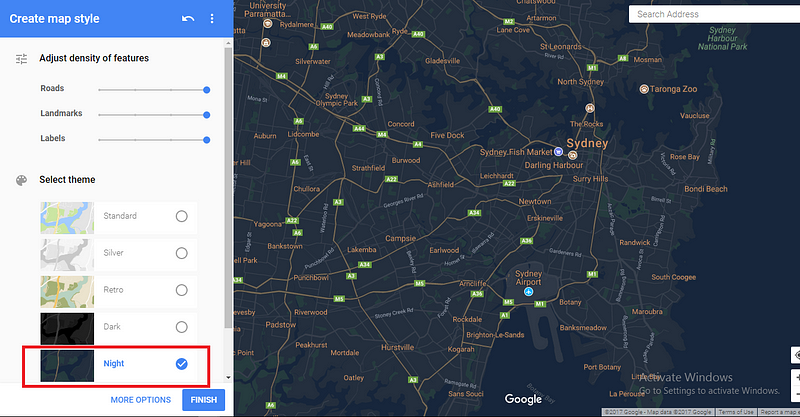
To style the map we can either style it ourselves by writing the json or we can use the google styling wizard to style the map, which returns json. In this tutorial i will be using the google styling wizard. You can edit and create new styles with the styling wizard tool Google provides, follow the link to the site https://mapstyle.withgoogle.com/.When you’re done tweaking the map you can click on FINISH. It should bring up a modal in which you can copy the json.
Adding The Custom Style To The Map
The json string is too long, so i prefer exporting it in a seperate file and importing it in the main file. We will create a file called mapStyle in the home page folder and save the json there. As shown below:
If you check the folder you should see a src folder. Navigate into it, you should see pages, we will be using the home page inside the pages folder to display our map. Now let’s install the plugin Get the api key and add it to the following code
Now we install the native wrapper
We can then import it in our home.ts file
If you check the folder you should see a src folder. Navigate into it, you should see pages, we will be using the home page inside the pages folder to display our map. Now let’s install the plugin Get the api key and add it to the following code
Now we install the native wrapper
We will get the current time of the day, then apply the appropriate style to the map. we will create a function that tells us if it’s night.
If you check the folder you should see a src folder. Navigate into it, you should see pages, we will be using the home page inside the pages folder to display our map. Now let’s install the plugin Get the api key and add it to the following code
Now we install the native wrapper
Introduction
Styling your native google map can be useful, if you have a brand and you want your map to match the brand. It can also provide better ux depending on the use case of the app, also useful for theming your app. In this tutorial we will be building a map that changes style depending on the time of the day. It will have a normal map style during the day and a dark style during the night.
Setting up project
To generate a new ionic project, run the following command in the ionic cli:
ionic start googleStyleMap blank
navigate into the project:
cd googleStyleMap
If you check the folder you should see a src folder. Navigate into it, you should see pages, we will be using the home page inside the pages folder to display our map. Now let’s install the plugin Get the api key and add it to the following code
ionic cordova plugin add https://github.com/mapsplugin/cordova-plugin-googlemaps#multiple_maps --variable API_KEY_FOR_ANDROID="YOUR_ANDROID_API_KEY_IS_HERE" --variable API_KEY_FOR_IOS="YOUR_IOS_API_KEY_IS_HERE"
 export const mapStyle = [
  {
        "elementType": "geometry",
        "stylers": [
          {
            "color": "#242f3e"
          }
        ]
      },
      {
        "elementType": "labels.text.fill",
        "stylers": [
          {
            "color": "#746855"
          }
        ]
      },...
  ]
We can then import it in our home.ts file
Introduction
Styling your native google map can be useful, if you have a brand and you want your map to match the brand. It can also provide better ux depending on the use case of the app, also useful for theming your app. In this tutorial we will be building a map that changes style depending on the time of the day. It will have a normal map style during the day and a dark style during the night.
Setting up project
To generate a new ionic project, run the following command in the ionic cli:
ionic start googleStyleMap blank
navigate into the project:
cd googleStyleMap
If you check the folder you should see a src folder. Navigate into it, you should see pages, we will be using the home page inside the pages folder to display our map. Now let’s install the plugin Get the api key and add it to the following code
ionic cordova plugin add https://github.com/mapsplugin/cordova-plugin-googlemaps#multiple_maps --variable API_KEY_FOR_ANDROID="YOUR_ANDROID_API_KEY_IS_HERE" --variable API_KEY_FOR_IOS="YOUR_IOS_API_KEY_IS_HERE"
import { mapStyle } from './mapStyle';
We will get the current time of the day, then apply the appropriate style to the map. we will create a function that tells us if it’s night.
Introduction
Styling your native google map can be useful, if you have a brand and you want your map to match the brand. It can also provide better ux depending on the use case of the app, also useful for theming your app. In this tutorial we will be building a map that changes style depending on the time of the day. It will have a normal map style during the day and a dark style during the night.
Setting up project
To generate a new ionic project, run the following command in the ionic cli:
ionic start googleStyleMap blank
navigate into the project:
cd googleStyleMap
If you check the folder you should see a src folder. Navigate into it, you should see pages, we will be using the home page inside the pages folder to display our map. Now let’s install the plugin Get the api key and add it to the following code
ionic cordova plugin add https://github.com/mapsplugin/cordova-plugin-googlemaps#multiple_maps --variable API_KEY_FOR_ANDROID="YOUR_ANDROID_API_KEY_IS_HERE" --variable API_KEY_FOR_IOS="YOUR_IOS_API_KEY_IS_HERE"
isNight(){
    //Returns true if the time is between
    //7pm to 5am
    let time = new Date().getHours();
    return (time > 5 && time < 19) ? false : true;
  }
We can the use the function to apply the style to the map. With the following code:
Introduction
Styling your native google map can be useful, if you have a brand and you want your map to match the brand. It can also provide better ux depending on the use case of the app, also useful for theming your app. In this tutorial we will be building a map that changes style depending on the time of the day. It will have a normal map style during the day and a dark style during the night.
Setting up project
To generate a new ionic project, run the following command in the ionic cli:
ionic start googleStyleMap blank
navigate into the project:
cd googleStyleMap
If you check the folder you should see a src folder. Navigate into it, you should see pages, we will be using the home page inside the pages folder to display our map. Now let’s install the plugin Get the api key and add it to the following code
ionic cordova plugin add https://github.com/mapsplugin/cordova-plugin-googlemaps#multiple_maps --variable API_KEY_FOR_ANDROID="YOUR_ANDROID_API_KEY_IS_HERE" --variable API_KEY_FOR_IOS="YOUR_IOS_API_KEY_IS_HERE"
initMap(){
    let element = this.mapElement.nativeElement;
    let loc: LatLng = new LatLng(40.7128, -74.0059);
    let time = new Date().getHours();
    let style = [];

    //Change Style to night between 7pm to 5am
    if(this.isNight()){
        style = mapStyle
    }

    this.map = this._googleMaps.create(element,{ styles: style });

    this.map.one(GoogleMapsEvent.MAP_READY).then(() => {
        this.moveCamera(loc);

    });
  }