Sunday, 20 January 2019

Ionic Native: Styling Google Maps

In our Previous post we have learned how to add Google Maps to our App, In this post lets try to add some custom styles to change look and feel of the Map to suite App Design.
Styling the Map

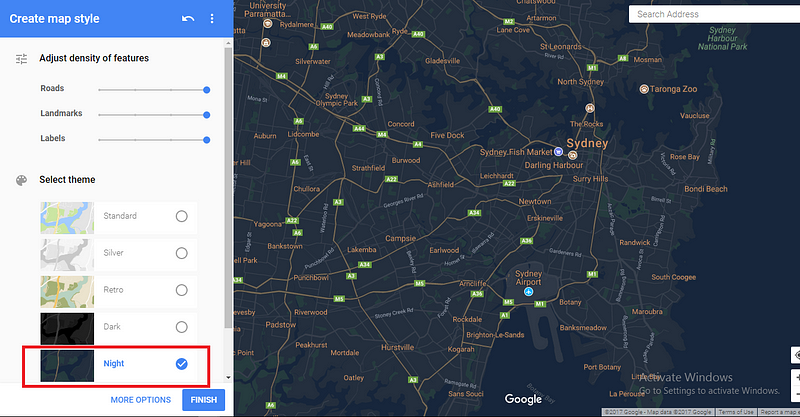
To style the map we can either style it ourselves by writing the json or we can use the google styling wizard to style the map, which returns json. In this tutorial i will be using the google styling wizard. You can edit and create new styles with the styling wizard tool Google provides, follow the link to the site https://mapstyle.withgoogle.com/.


When you’re done tweaking the map you can click on FINISH. It should bring up a modal in which you can copy the json.

Adding The Custom Style To The Map

The json string is too long, so i prefer exporting it in a seperate file and importing it in the main file. We will create a file called mapStyle in the home page folder and save the json there. As shown below:

Introduction

Styling your native google map can be useful, if you have a brand and you want your map to match the brand. It can also provide better ux depending on the use case of the app, also useful for theming your app. In this tutorial we will be building a map that changes style depending on the time of the day. It will have a normal map style during the day and a dark style during the night.

Setting up project

To generate a new ionic project, run the following command in the ionic cli:


iTechnoFreaks
 
  ionic start googleStyleMap blank

navigate into the project:


iTechnoFreaks
 
  cd googleStyleMap

If you check the folder you should see a src folder. Navigate into it, you should see pages, we will be using the home page inside the pages folder to display our map. Now let’s install the plugin Get the api key and add it to the following code


iTechnoFreaks
 
  ionic cordova plugin add https://github.com/mapsplugin/cordova-plugin-googlemaps#multiple_maps --variable API_KEY_FOR_ANDROID="YOUR_ANDROID_API_KEY_IS_HERE" --variable API_KEY_FOR_IOS="YOUR_IOS_API_KEY_IS_HERE"
Now we install the native wrapper


iTechnoFreaks
 export const mapStyle = [
  {
        "elementType": "geometry",
        "stylers": [
          {
            "color": "#242f3e"
          }
        ]
      },
      {
        "elementType": "labels.text.fill",
        "stylers": [
          {
            "color": "#746855"
          }
        ]
      },...
  ]

We can then import it in our home.ts file

Introduction

Styling your native google map can be useful, if you have a brand and you want your map to match the brand. It can also provide better ux depending on the use case of the app, also useful for theming your app. In this tutorial we will be building a map that changes style depending on the time of the day. It will have a normal map style during the day and a dark style during the night.

Setting up project

To generate a new ionic project, run the following command in the ionic cli:


iTechnoFreaks
 
  ionic start googleStyleMap blank

navigate into the project:


iTechnoFreaks
 
  cd googleStyleMap

If you check the folder you should see a src folder. Navigate into it, you should see pages, we will be using the home page inside the pages folder to display our map. Now let’s install the plugin Get the api key and add it to the following code


iTechnoFreaks
 
  ionic cordova plugin add https://github.com/mapsplugin/cordova-plugin-googlemaps#multiple_maps --variable API_KEY_FOR_ANDROID="YOUR_ANDROID_API_KEY_IS_HERE" --variable API_KEY_FOR_IOS="YOUR_IOS_API_KEY_IS_HERE"
Now we install the native wrapper


iTechnoFreaks
import { mapStyle } from './mapStyle';

We will get the current time of the day, then apply the appropriate style to the map. we will create a function that tells us if it’s night.

Introduction

Styling your native google map can be useful, if you have a brand and you want your map to match the brand. It can also provide better ux depending on the use case of the app, also useful for theming your app. In this tutorial we will be building a map that changes style depending on the time of the day. It will have a normal map style during the day and a dark style during the night.

Setting up project

To generate a new ionic project, run the following command in the ionic cli:


iTechnoFreaks
 
  ionic start googleStyleMap blank

navigate into the project:


iTechnoFreaks
 
  cd googleStyleMap

If you check the folder you should see a src folder. Navigate into it, you should see pages, we will be using the home page inside the pages folder to display our map. Now let’s install the plugin Get the api key and add it to the following code


iTechnoFreaks
 
  ionic cordova plugin add https://github.com/mapsplugin/cordova-plugin-googlemaps#multiple_maps --variable API_KEY_FOR_ANDROID="YOUR_ANDROID_API_KEY_IS_HERE" --variable API_KEY_FOR_IOS="YOUR_IOS_API_KEY_IS_HERE"
Now we install the native wrapper


iTechnoFreaks
isNight(){
    //Returns true if the time is between
    //7pm to 5am
    let time = new Date().getHours();
    return (time > 5 && time < 19) ? false : true;
  }

We can the use the function to apply the style to the map. With the following code:

Introduction

Styling your native google map can be useful, if you have a brand and you want your map to match the brand. It can also provide better ux depending on the use case of the app, also useful for theming your app. In this tutorial we will be building a map that changes style depending on the time of the day. It will have a normal map style during the day and a dark style during the night.

Setting up project

To generate a new ionic project, run the following command in the ionic cli:


iTechnoFreaks
 
  ionic start googleStyleMap blank

navigate into the project:


iTechnoFreaks
 
  cd googleStyleMap

If you check the folder you should see a src folder. Navigate into it, you should see pages, we will be using the home page inside the pages folder to display our map. Now let’s install the plugin Get the api key and add it to the following code


iTechnoFreaks
 
  ionic cordova plugin add https://github.com/mapsplugin/cordova-plugin-googlemaps#multiple_maps --variable API_KEY_FOR_ANDROID="YOUR_ANDROID_API_KEY_IS_HERE" --variable API_KEY_FOR_IOS="YOUR_IOS_API_KEY_IS_HERE"
Now we install the native wrapper


iTechnoFreaks
initMap(){
    let element = this.mapElement.nativeElement;
    let loc: LatLng = new LatLng(40.7128, -74.0059);
    let time = new Date().getHours();
    let style = [];

    //Change Style to night between 7pm to 5am
    if(this.isNight()){
        style = mapStyle
    }

    this.map = this._googleMaps.create(element,{ styles: style });

    this.map.one(GoogleMapsEvent.MAP_READY).then(() => {
        this.moveCamera(loc);

    });
  }
We create an empty style array which we populate with our mapStyle we imported above if it is night or not. The create method takes an additional argument which is an object of settings for the map. One of the properties is the styles property which we can assign to our style array we just created.

Saturday, 19 January 2019

Ionic Native: Implementing Google Maps

Introduction

Styling your native google map can be useful, if you have a brand and you want your map to match the brand. It can also provide better ux depending on the use case of the app, also useful for theming your app. In this tutorial we will be building a map that changes style depending on the time of the day. It will have a normal map style during the day and a dark style during the night.

Setting up project

To generate a new ionic project, run the following command in the ionic cli:


iTechnoFreaks
 
  ionic start googleStyleMap blank

navigate into the project:


iTechnoFreaks
 
  cd googleStyleMap

If you check the folder you should see a src folder. Navigate into it, you should see pages, we will be using the home page inside the pages folder to display our map. Now let’s install the plugin Get the api key and add it to the following code


iTechnoFreaks
 
  ionic cordova plugin add https://github.com/mapsplugin/cordova-plugin-googlemaps#multiple_maps --variable API_KEY_FOR_ANDROID="YOUR_ANDROID_API_KEY_IS_HERE" --variable API_KEY_FOR_IOS="YOUR_IOS_API_KEY_IS_HERE"
Now we install the native wrapper


iTechnoFreaks
 
  npm install --save @ionic-native/google-maps
Navigate to your app.module.ts file under app folder. Import { GoogleMaps } from "@ionic-native/google-maps" and add it to the providers. As shown below


iTechnoFreaks
 
  import { BrowserModule } from '@angular/platform-browser';
import { ErrorHandler, NgModule } from '@angular/core';
import { IonicApp, IonicErrorHandler, IonicModule } from 'ionic-angular';
import { SplashScreen } from '@ionic-native/splash-screen';
import { StatusBar } from '@ionic-native/status-bar';

import { MyApp } from './app.component';
import { HomePage } from '../pages/home/home';
import { GoogleMaps } from '@ionic-native/google-maps'

@NgModule({
  declarations: [
    MyApp,
    HomePage
  ],
  imports: [
    BrowserModule,
    IonicModule.forRoot(MyApp)
  ],
  bootstrap: [IonicApp],
  entryComponents: [
    MyApp,
    HomePage
  ],
  providers: [
    StatusBar,
    SplashScreen,
    GoogleMaps,
    {provide: ErrorHandler, useClass: IonicErrorHandler}
  ]
})
export class AppModule {}
Creating the map Now that the ionic native plugin has been set up, we can now create the map. Lets start by adding a map to the home page:


iTechnoFreaks


     Google Map Style


We need to modify the home.ts file to generate a map. Add the following to home.ts :


iTechnoFreaks
 
  import { Component, ElementRef, ViewChild } from '@angular/core';
import { NavController } from 'ionic-angular';
import { GoogleMaps, GoogleMap, CameraPosition, LatLng, GoogleMapsEvent } from '@ionic-native/google-maps';

@Component({
  selector: 'page-home',
  templateUrl: 'home.html'
})
export class HomePage {
  @ViewChild('map') mapElement: ElementRef;
  map: GoogleMap;

  constructor(public navCtrl: NavController,private _googleMaps: GoogleMaps) { }

  ngAfterViewInit(){
    this.initMap();
  }

  initMap(){
    let element = this.mapElement.nativeElement;
    let loc: LatLng = new LatLng(40.7128, -74.0059);

    this.map = this._googleMaps.create(element,{ styles: []});

    this.map.one(GoogleMapsEvent.MAP_READY).then(() => {
        this.moveCamera(loc);
    });
  }
  moveCamera(loc: LatLng){
      let options: CameraPosition = {
        target: loc,
        zoom: 15,
        tilt: 10
      }
      this.map.moveCamera(options);
  }

}
Now that we have created the map and the camera is currently pointing at Newyork. You should see the map on your device

Thursday, 17 January 2019

Ionic 3 - Project Structure

Before we start building our application, let’s take a close look at the anatomy of an ionic application. Inside the folder that was created during the scaffold, you have a typical Cordova project structure where you’ll be able to install native plugins and create platform-specific project files.

./src/index.html

src/index.html is the main entry point for the app. Much like the index.html file from angular projects you worked on yesterday, you'll spend very little time in this file while building your application. It's main purpose is to setup script and CSS includes and bootstrap, or start running, our application.

For the app to function, Ionic will look for the <ion-app> tag in your index.html file. Think of this as the root component for your ionic application.

./src/

Inside the src directory, you'll find all your uncompiled code. This is where you'll spend most of your time while building your app. When you run ionic serve, all the code inside of src/ is transpiled into a Javascript version that is supported by most browser.

Adding a Page

Just like with rails and angular, Ionic provide us with a generator to scaffold the most common components to an app. We will be using that to generate a new page.

$ ionic g page calculator

If you take a look at your src/pages/ folder, you'll see that a new folder name calculator has been created.

Every time you created a new page, you need to tell the application about it by importing it in app.module.ts. Open it and add the following line at the top of it

import { CalculatorPage } from '../pages/calculator/calculator'

Then add CalculatorPage to the declarations and entryComponents properties. Next, we also import CalculatorPage in src/pages/tabs/tabs.ts and create a new tab for it.


Sunday, 13 January 2019

Getting Started with IONIC3


This tutorial will help you in getting started with Ionic and Cordova Framework.
Step 1: Install Node.js
Most of the tools in the ionic is based on Node and is managed through npm. The best way to get npm installed is through the Node.js.

You can get the latest Node.js installer here: https://nodejs.org

Be sure to install the LTS version of Node.

Check if installation was successful by running npm -version


Step 2: Install Cordova
Cordova command-line runs on Node.js and is available on npm.

run: npm install -g cordova

This will install cordova globally on your machine.


Step 3: Install Java
Install Java Development Kit (JDK) 8.

When installing on Windows you also need to set JAVA_HOME Environment Variable according to your JDK installation path

After this, run: javac


If you get this, we are good to go ahead.

Step 4: Android SDK
Cordova for Android requires the Android SDK. To avoid issues in installation, lets first install Android Studio which will streamline the process.
Step 5: Install Ionic
Ionic comes with a convenient command line utility to start, build, and package Ionic apps.

To install it, simply run: npm install -g ionic
Step 6: Start an app
Create an Ionic App using one of our ready-made app templates, or a blank one to start fresh.

run: ionic start demoApp tabs
This will take time. Node modules are heavy, very heavy!
Step 7: Run your app
Run:

cd demoApp
ionic serve
Your app can be built right in the browser with ionic serve


It will launch the app in browser. If it doesn’t you can go to localhost:8100 as shown in the cmd

Friday, 11 January 2019

Angular 6 - Lifecycles

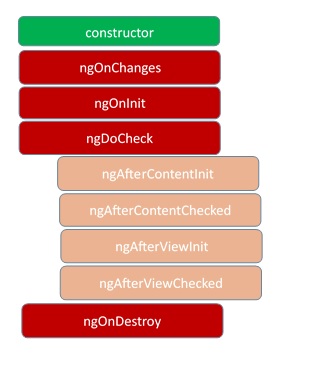
In Angular, every component has a life-cycle, a number of different stages it goes through. There are 8 different stages in the component lifecycle. Every stage is called as lifecycle hook event. So, we can use these hook events in different phases of our application to obtain control of the components. Since a component is a TypeScript class, every component must have a constructor method. The constructor of the component class executes, first, before the execution of any other lifecycle hook events. If we need to inject any dependencies into the component, then the constructor is the best place to inject those dependencies. After executing the constructor, Angular executes its lifecycle hook methods in a specific order.

Component Life Cycle Hook
These stages are mainly divided into two phases – one is linked to the component itself and another is linked to the children of that component.


  • ngOnChanges – This event executes every time when a value of an input control within the component has been changed. Actually, this event is fired first when a value of a bound property has been changed. It always receives a change data map, containing the current and previous value of the bound property wrapped in a SimpleChange.
  • ngOnInit – This event initializes after Angular first displays the data-bound properties or when the component has been initialized. This event is basically called only after the ngOnChanges()events. This event is mainly used for the initialize data in a component.
  • ngDoCheck – This event is triggered every time the input properties of a component are checked. We can use this hook method to implement the check with our own logic check. Basically, this method allows us to implement our own custom change detection logic or algorithm for any component.
  • ngAfterContentInit –  This lifecycle method is executed when Angular performs any content projection within the component views. This method executes when all the bindings of the component need to be checked for the first time. This event executes just after the ngDoCheck() method. This method is basically linked with the child component initializations.
  • ngAfterContentChecked – This lifecycle hook method executes every time the content of the component has been checked by the change detection mechanism of Angular. This method is called after the ngAfterContentInit() method. This method is also called on every subsequent execution of ngDoCheck(). This method is also mainly linked with the child component initializations.
  • ngAfterViewInit – This lifecycle hook method executes when the component’s view has been fully initialized. This method is initialized after Angular initializes the component’s view and child views. It is called after ngAfterContentChecked(). This lifecycle hook method only applies to components.
  • ngAfterViewChecked – This method is called after the ngAterViewInit() method. It is executed every time the view of the given component has been checked by the change detection algorithm of Angular. This method executes after every subsequent execution of the ngAfterContentChecked(). This method also executes when any binding of the children directives has been changed. So this method is very useful when the component waits for some value which is coming from its child components.
  • ngOnDestroy – This method will be executed just before Angular destroys the components. This method is very useful for unsubscribing from the observables and detaching the event handlers to avoid memory leaks. Actually, it is called just before the instance of the component is finally destroyed. This method is called just before the component is removed from the DOM.

Thursday, 10 January 2019

Angular 6 Services

Angular Services


Angular services concept always confuses newbies with server side REST services. If you are still not sure what it is, I will recommend you to read Angular documentation

Angular Services have responsibility to provide application data/business logic to components. Components should take/provide data to service and function as glue between view and service. It is service who can decide whether to provide mock data or go to server and fetch data from database/file/another service(s) etc.

Ideally, services should be feature oriented. You have choice to build a giant service class or micro services collections. In first approach, there shall be only one service which shall contain all business logic and shall be provided via Angular Dependency Injection in all components within system. Issue with this approach is, giant service class shall get bloated eventually leading performance issue. Every component shall get injected with service and functionality which is not required to consumer component at all. Do you think it is good?

In second approach (followed widely), feature specific micro service gets built. For example, if your system have Login, SignUp, Dashboard components then you shall build LoginService, SignUpService, DashboardService and so on. Each service shall contain functionality required for specific targeted component. Now this design looks good, isn’t it?

Problem?


While building big and complex Single Page Application using Angular, you shall soon end up with hundreds and thousands of component classes. Having said so, you shall have similar number of Angular services injected. What is the problem here?

No matter how good naming convention you have followed for building components and services, there shall be time required to figure out specific name of service for specific class. Also you may end up writing duplicate service class with slightly different name for same component than other team built. If you are working in Extreme Programming model, your frontend developers are supposed to keep switching between modules/components/features. It should not take much time for them to figure out components and services associated.

Solution


We can solve this problem using Facade design pattern.

Facade Design Pattern

Facade discusses encapsulating a complex subsystem within a single interface object. This reduces the learning curve necessary to successfully leverage the subsystem. It also promotes decoupling the subsystem from its potentially many clients.

The Facade object should be a fairly simple advocate or facilitator. It should not become an all-knowing oracle or “god” object.

Here is the good read for Facade design pattern in details

Wednesday, 9 January 2019

Angular 6 Auth Guards / Route Guards - The Magic Autharization

What are Route Guards?


Angular’s route guards are interfaces which can tell the router whether or not it should allow navigation to a requested route. They make this decision by looking for a true or false return value from a class which implements the given guard interface.

There are five different types of guards and each of them is called in a particular sequence. The router’s behavior is modified differently depending on which guard is used.

The guards are:


  1. CanActivate
  2. CanActivateChild
  3. CanDeactivate
  4. CanLoad
  5. Resolve


Create a new service which implements the route guard. You can call it whatever you like, but something like auth-guard.service is generally sufficient.


iTechnoFreaks
  // src/app/auth/auth-guard.service.ts
import { Injectable } from '@angular/core';
import { Router, CanActivate } from '@angular/router';
import { AuthService } from './auth.service';
@Injectable()
export class AuthGuardService implements CanActivate {
  constructor(public auth: AuthService, public router: Router) {}
  canActivate(): boolean {
    if (!this.auth.isAuthenticated()) {
      this.router.navigate(['login']);
      return false;
    }
    return true;
  }
}

The service injects AuthService and Router and has a single method called canActivate. This method is necessary to properly implement the CanActivate interface.


The canActivate method returns a boolean indicating whether or not navigation to a route should be allowed. If the user isn’t authenticated, they are re-routed to some other place, in this case a route called /login.

Now the guard can be applied to any routes you wish to protect.


iTechnoFreaks
  // src/app/app.routes.ts
import { Routes, CanActivate } from '@angular/router';
import { ProfileComponent } from './profile/profile.component';
import { 
  AuthGuardService as AuthGuard 
} from './auth/auth-guard.service';
export const ROUTES: Routes = [
  { path: '', component: HomeComponent },
  { 
    path: 'profile',
    component: ProfileComponent,
    canActivate: [AuthGuard] 
  },
  { path: '**', redirectTo: '' }
];


The /profile route has an extra config value now: canActivate. The AuthGuard that was created above is passed to an array for canActivate which means it will be run any time someone tries to access the /profile route. If the user is authenticated, they get to the route. If not, they are redirected to the /login route.

Tuesday, 8 January 2019

Angular 6 Routing

When we run an Angular application and serve it on a port number say ( 4200 ), we get our application running at http://localhost:4200

This is the only path our browser understands, and hence it can’t serve different destinations on different paths such as http://localhost:4200/items. But, What if we have multiple paths in the same application ?

How to achieve custom URL paths

Javascript Router: It makes our lives easier by changing the destination whenever the path changes. In technical terms, by changing the application state whenever the browser URL changes and vice-versa.

These Routers are written in certain Javascript Frameworks and for Angular we have it packaged as @angular/router


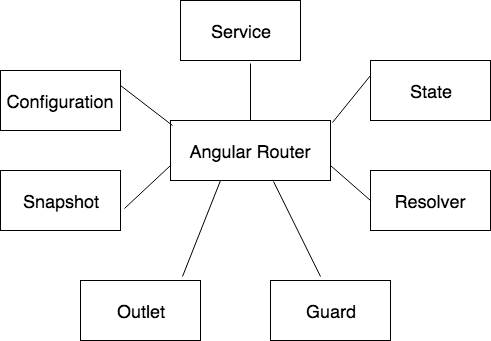
The @angular/router contains the shown terms:


  1. Service: This is a global service present inside the Angular Application.
  2. State: The state of Router is maintained by Router State.
  3. Configuration: It maintains information about all the routing states which is present inside the application.
  4. Guard: This is a code that runs whenever the router is activated, deactivated or loaded.
  5. Snapshot: It will provide access to state and data for a particular route node.
  6. Resolver: The script that will fetch data before the requested page is initiated.
  7. Outlet: This is the location in DOM for router outlet to place it’s components.

Now Let's Code:

To tell the paths and destinations to your browser, you need to import the RouterModule and Routes from @angular/router into your app.module.ts file.


iTechnoFreaks
> import {RouterModule, Routes} from '@angular/router';
After this, you can define an array of your paths and destination pages.


iTechnoFreaks
const routes: Routes = [
  {
    path: '',
    redirectTo: 'items',
    pathMatch: 'full'
  },
  {
    path: 'items',
    component: AppComponent
  }
];
Note: Here, the pathMatch is specifying a strict matching of path to reach the destination page.
Now, you need to pass the routes array in the RouterModule using RouterModule.forRoot(routes) and have to add it to imports


iTechnoFreaks
> RouterModule.forRoot(routes)
app.module.ts file will look like this:


iTechnoFreaks
import { BrowserModule } from '@angular/platform-browser';
import { NgModule } from '@angular/core';
import {RouterModule, Routes} from '@angular/router';
import { AppComponent } from './app.component';


const routes: Routes = [
  {
    path: '',
    redirectTo: 'items',
    pathMatch: 'full'
  },
  {
    path: 'items',
    component: AppComponent
  }
];

@NgModule({
  declarations: [
    AppComponent,
  ],
  imports: [
    BrowserModule,
    RouterModule.forRoot(routes)
  ],
  providers: [],
  bootstrap: [AppComponent]
})
export class AppModule { }

Wednesday, 2 January 2019

Introduction to Angular6: A beginner’s guide - Part 2

Introduction to Angular6: A beginner’s guide  - Part 1

How to Create a Component


Use ng generate to create a new component


iTechnoFreaks
> ng generate component hello-world


Let's look into our component class HelloWorldComponent

(basepath/src/app/hello-world)

Below is how the code looks


iTechnoFreaks
import { Component, OnInit } from '@angular/core';

@Component({
selector: 'app-hello-world',
templateUrl: './hello-world.component.html',
styleUrls: ['./hello-world.component.scss']
})
export class HelloWorldComponent implements OnInit {

constructor() { }

ngOnInit() {
}

}
Each component has a lifecycle of create, update and destroy. angular exposes hooks to interfare when these events occur in a component’s lifetime. these hooks can be implemented using corresponding lifecycle hook interface from angular core library.

Wednesday, 19 December 2018

Introduction to Angular6: A beginner’s guide

Angular, the most widely used framework for creating SPA’s.


SPA in web terminology stands for "Single-Page Application".


Why Single-Page Apps?


While traditional web apps require consistent rendering of data from server leading to a page-reload for every app request, the spa’s however, avoid this performance issue by loading content on the browser using Javascript, so most of the work is done on client-side.

If you are wondering whether the app is really a single page then, the answer is yes! there is only one URL or in simple terms one html page as such,and everything is rendered on the same page, you can fill a form, click a link and do almost everything on that page.

Essentially, it creates an illusion of navigating through pages which in fact doesn’t happen in reality. This leaves the user with a reactive experience.

Thursday, 14 January 2016

Vertical Fixed Navigation #2

A smart vertical navigation, with round indicators that turn into labelled icons when the user interacts with them.


Our first concept of vertical fixed navigation is one of our most popular resources. This time, we tried to push this concept a little further.
The basic idea behind putting round indicators on the side of a web page, is to give a hint to the user about the number of sections she/he can go through. We think of each dot as a content chapter, with its own title. Usually, users have to hover over a dot to access the title.
In an attempt to simplify this pattern, we decided to transform the dots when the user interacts with them, by scaling them up and showing an icon + label. Users don’t need to select a specific dot/item, but just move to the side, thus showing their willingness to access the navigation.

Cinema Seat Preview Experiment

Maybe you are familiar with those ticket booking systems where, at some point during the purchase flow, you have to choose a seat. This is usually done when selling tickets for games, movies, flights or concerts. Wouldn’t it be cool to have some kind of “realistic” preview of the seat, i.e. see the stage or screen from the perspective of the space you chose? Of course it would :) This is the kind of question that resulted into a new experiment which we’d like to share with you today.
Attention: Some of the techniques we are using are very experimental and won’t work in all browsers. Support for transform-style: preserve-3d is necessary for this demo.
So the idea is to show some kind of cinema room where we can choose seats from a seating plan. When choosing a seat, we’ll move to the respective position in the room and allow the user to see the real view from the chosen place. There is also a button in the center of the page that allows to unlock the rotation of the viewer, something that is quite important for a realistic view considering that we can rotate and tilt our heads.

Tuesday, 17 June 2014

Feature Support & Polyfills

Building a website can be both extremely rewarding and frustrating. Common frustrations arise from trying to get a website to look and perform the same in every browser. All front end developers have shared this frustration at one point or another.
Truth be told, websites do not need to look or perform the same in every browser. Exactly how close a website works in each browser is up to you and your level of comfort for a given website. If a website receives under half a percent of traffic from Internet Explorer 6 it might make sense to drop support for it. If that half a percent is still contributing to thousands of dollars in sales, support may be mandatory. Determine what is acceptable for a given website and work from there.
There are a handful of common practices to get websites to perform adequately in all browsers, some of which have already been covered within this guide. When incorporating CSS3 properties, fallbacks are recommend to support older browsers. Other techniques include shivs and polyfills. Generally speaking, shivs and polyfills are small JavaScript plugins that add support for a requested set of features not natively supported by a specific browser.

HTML5 Shiv

Perhaps the most popular shiv, and one you may have likely used already, is the HTML5 Shiv. The HTML5 Shiv was created by Remy Sharp to provide the ability to use HTML5 elements within versions of Internet Explorer 8 and below. The HTML5 Shiv not only creates support for HTML5 elements but also allows them to be properly styled with CSS.
The shiv should be downloaded from Google, where Remy maintains the latest version, then hosted on your server. For the best performance, reference the shiv JavaScript file within the head of the document, after any stylesheet references. Additionally, you want to reference the shiv inside of a conditional comment, making sure that the file is only loaded within versions of Internet Explorer 8 and below.
In this case the conditional comment looks like <!--[if lt IE 9]>...<![endif]-->.
1
2
3
<!--[if lt IE 9]>
  <script src="html5shiv.js"></script>
<![endif]-->

The Difference Between a Shiv & a Shim

Chances are you may have heard of both the HTML5 Shiv and HTML5 Shim, and wondered what the difference, if any, may be. Oddly enough, there is nodifference between the HTML5 Shiv and HTML5 Shim. The two words are often used interchangeably and are commonly transposed.
Additionally, once the new HTML5 elements are created using the shiv, any block level elements need to be identified and updated using the display: block; declaration.
1
2
3
4
5
6
7
8
9
10
11
12
13
article,
aside,
details,
figcaption,
figure,
footer,
header,
hgroup,
nav,
section,
summary {
  display: block;
}
Lastly, Internet Explorer 8 and 9 do not correctly define styles for a few HTML5inline-block level elements. As before, these styles will need to be explicitly stated. After which, all versions of Internet Explorer should be good to go using any new HTML5 elements.
1
2
3
4
5
audio,
canvas,
video {
  display: inline-block;
}

Detecting Browser Features

Referencing the HTML5 Shiv works well with a conditional comment because the intention is to specifically target browsers that don’t support new HTML5 features and elements. Additionally, there is a way to to provide support for specific HTML5 and CSS3 features, regardless of which browser is being used.
Feature detection, as provided by Modernizr, provides a way to write conditional CSS and JavaScript based on whether or not a browser supports a specific feature. For example, if a browser supports rounded corners Modernizr will add the class ofborderradius to the html element. If the browser doesn’t support rounded corners, Modernizr will add the class of no-borderradius to the html element.

Loading Modernizr

To get feature detection with Modernizr up and running, simply visit their downloadpage and customize what features you are looking to detect, or use the out of the box development version. Most commonly the development version is the way to go, however, if you are only looking for support for one feature, a custom build would be more appropriate. Once downloaded, upload the JavaScript file on your server and reference it within the head of your HTML document, below any referenced style sheets.
It is worth noting that Modernizr may be configured to include the HTML5 Shiv, in which case the shiv doesn’t need to be referenced on top of Modernizr.
1
<script src="modernizr.js"></script>

Conditionally Applying CSS Styles

Once Modernizr is up and running CSS styles may be conditionally applied based on the features a given browser supports. Modernizr has detection for the majority of the CSS3 properties and values, all of which can be found in the Modernizrdocumentation.
One item to weigh out is if feature detection is necessary for certain styles. For example, using an RGBa color value may easily be supported with a fallback hexadecimal value without the use of feature detection. When deciding to use feature detection, it is important to keep styles organized and performance in mind. Avoid duplicating any code or making additional HTTP requests when possible.
1
2
3
4
5
6
7
8
9
10
11
12
13
14
15
16
17
18
19
20
21
22
23
24
25
26
27
28
29
30
31
32
33
34
35
36
37
button {
  border: 0;
  color: #fff;
  cursor: pointer;
  font-size: 14px;
  font-weight: 600;
  margin: 0;
  outline: 0;
}

/* With CSS Gradient Styles */

.cssgradients button {
  border: 1px solid #0080c2;
  background: linear-gradient(#00a2f5, #0087cc);
  border-radius: 6px;
  padding: 15px 30px;
}
.cssgradients button:hover {
  background: linear-gradient(#1ab1ff, #009beb);
}
.cssgradients button:active {
  box-shadow: inset 0 1px 10px rgba(255, 255, 255, .5);
}

/* Without CSS Gradient Styles */

.no-cssgradients button {
  background: transparent url("button.png") 0 0 no-repeat;
  padding: 16px 31px;
}
.no-cssgradients button:hover {
  background-position: 0 -49px;
}
.no-cssgradients button:active {
  background-position: 0 -98px;
}

Feature Detection Demo

In the demonstration above, the button inherits some default styles. However, specific styles are only applied based on whether or not CSS3 gradient background are supported. In this case, rounded corners and box shadows are also included within the conditional styles. Those browsers that support gradients get a gradient background, rounded corners, and a box shadow. Those browsers that do not receive an image with all of these styles included within the image. With this code none of the styles are being over written and an HTTP request is only made when necessary.
When working with CSS3 feature detection it is hard to know what the styles look like in browsers that do not support specific CSS3 features. Fortunately, there is a bookmarklet called deCSS3 which disables any CSS3 features. Doing so allows you to see what a website would look like without CSS3, and if your conditional styles are working. To get a quick idea of what an individual browser supports, visit haz.io within that specific browser.